How to Insulate AC Lines
Boost HVAC efficiency and prevent water damage by properly insulating your AC's refrigerant lines. Learn when to DIY and when to call a pro with this practical guide.
Insulate Promptly at First Sign of Degradation
Replacing cracked or missing suction-line insulation is a low-cost, high-impact DIY task that prevents water damage and reduces energy waste. Homeowners should inspect annually and act immediately when foam deteriorates, but never touch refrigerant-bearing components.
What Matters Most
- Inspect outdoor AC line insulation each spring
- Replace at first cracking, crumbling, or sweating
- Use UV-resistant closed-cell foam or elastomeric rubber
- Seal the wall penetration to block pests and moisture
- Leave refrigerant, electrical, and frost-related issues to pros
Strengths
- Prevents structural water damage from condensation
- Improves cooling efficiency by 2–5% with minimal material cost
- No specialized tools or permits required for safe homeowner work
- Immediate satisfaction—a 30-minute project for most
Weaknesses
- Does not address underlying refrigerant leaks or airflow issues
- UV exposure will degrade foam again unless shielded or replaced periodically
- Indoor insulation replacement may require wall access and professional help
Decision Summary
| Scenario | Usually do | Why |
|---|---|---|
| Insulation is cracked or missing | DIY replace with correct-size foam | Stops condensation, restores thermal barrier |
| Line shows frost or oily residue | Call a pro | Indicates possible refrigerant leak or system problem |
| Insulation looks fine but indoor humidity is high | Check wall seal and seams | Air gaps let moisture bypass insulation |
| System is over 12 years old and insulation keeps failing | Use repair/replace calculator | May be more cost-effective to upgrade system |
Why Insulating Your AC Lines Matters
Your outdoor air conditioner has two copper lines running into the house. The larger, insulated suction line carries cold refrigerant gas from the indoor evaporator coil to the compressor. Without proper insulation, this cold line sweats in humid air, drips water into walls or ceilings, and absorbs outdoor heat—forcing your system to work harder and use more energy. A well-insulated line can improve cooling efficiency by 2–5% and prevent costly moisture damage.
Quick Answer
Inspect your exposed refrigerant line insulation annually. If you see cracking, crumbling, bare copper, or water stains where the line enters the home, replace the insulation immediately as a low-cost DIY project. Use UV-resistant closed-cell foam tubing sized to your pipe (commonly ⅝˝, ¾˝, or ⅞˝). When in doubt, check our HVAC cost estimator to budget for a pro handling insulation along with a tune‑up.
Symptom & Decision Table
| Symptom | Likely Issue | Action |
|---|---|---|
| Black foam is cracked, crumbly, or missing in sections | UV/weather degradation | Replace all exposed insulation; check indoor chase |
| Water drips from line where it enters the house | Condensation due to missing insulation or air gap | Replace insulation and seal entry point with foam |
| Ice or heavy frost on the large copper line | Low refrigerant or airflow problem | STOP—call a pro; see Safety Boundaries |
| Oily residue on copper lines | Possible refrigerant leak | Do not insulate over leak; schedule pro inspection |
| Insulation looks intact but pipe sweats | Undersized insulation or failed adhesive seam | Tape seams with UV-resistant HVAC tape; replace if gap persists |
Materials and Editorial Cost Estimates
Insulation itself is inexpensive; the real savings come from avoided energy waste and water damage. Below are typical retail prices for 6‑ft lengths of pre‑slit pipe insulation—always measure your pipe diameter first.
| Material | Type | Best For | Cost per 6 ft (editorial estimate) |
|---|---|---|---|
| Polyethylene foam (black, closed‑cell) | Standard duty | Mild climates, shaded areas | $3–$8 |
| Elastomeric rubber (e.g., Armaflex) | Heavy duty | High humidity, harsh sun, coastal | $8–$18 |
| UV‑resistant foam tape (2˝ × 30 ft) | Accessory | Sealing seams and joints | $8–$15 |
| Plastic cable ties (UV‑resistant, 8˝) | Accessory | Secondary securing if adhesive fails | $5–$10 per pack |
Editorial estimates based on home‑center and supply‑house prices as of mid‑2025. Your local cost may vary.
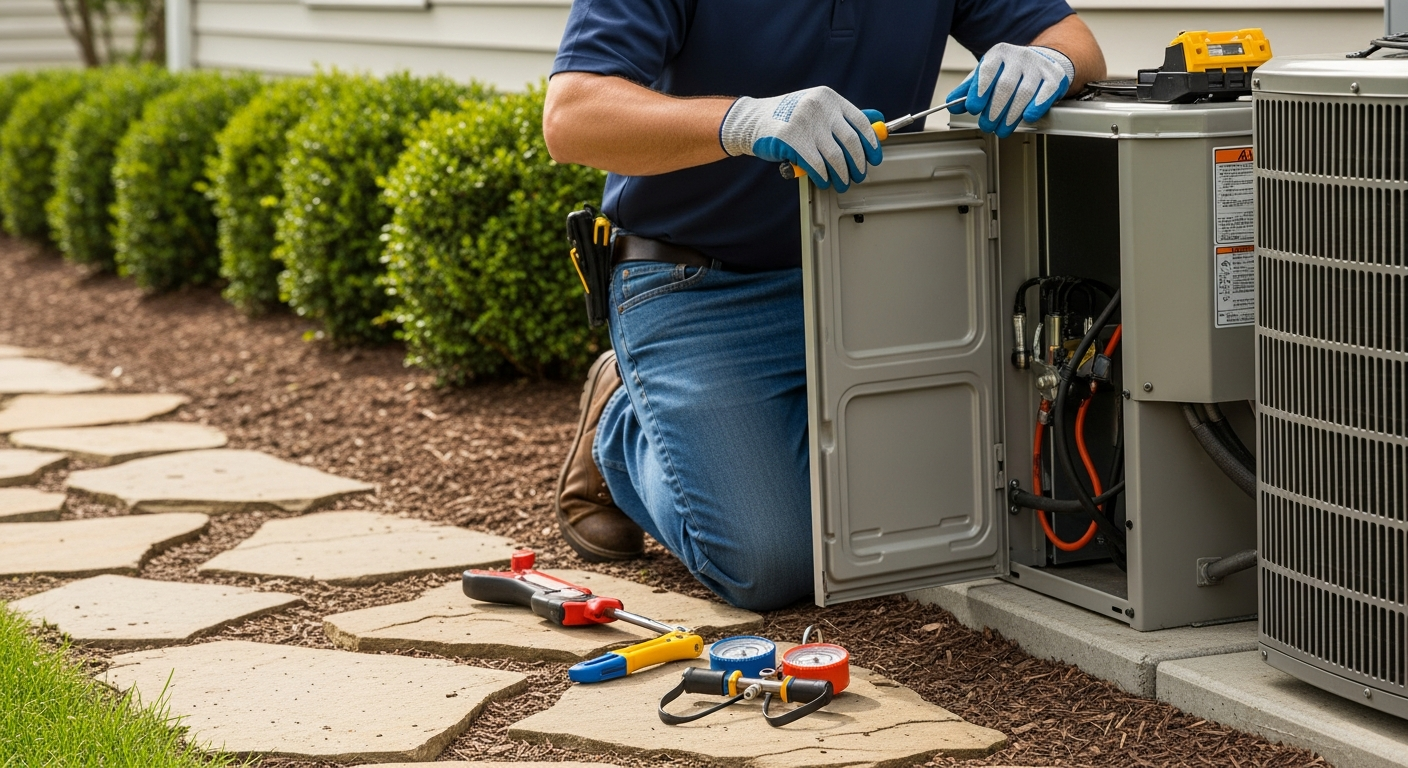
Step‑by‑Step Guide (Safe Homeowner Work)
Follow these steps only on the exposed outdoor portion of the suction line. Do not open any refrigerated, electrical, or combustion components.
- Turn off the thermostat so the system doesn’t cycle while you work.
- Clean the copper with a dry rag or mild soapy water; let it dry completely.
- Measure the pipe diameter and the total length of exposed line you need to cover. Cut insulation 1–2˝ longer than the measured run; you can trim later.
- Slide pre‑slit insulation over the pipe with the slit facing downward (prevents water pooling). Press the adhesive seam firmly along the full length.
- If your insulation lacks adhesive, use UV‑resistant tape or zip ties every 6–12˝. Do not overtighten—compressed foam loses R‑value.
- Seal all joints and the wall‑entry point with foam tape or a bead of exterior silicone. A clean seal blocks pests, moisture, and thermal bypass.
Safety Boundaries
What a homeowner can safely check:
- Visual inspection of insulation condition
- Cleaning and replacing external foam insulation
- Sealing wall penetrations with caulk or foam
- Checking for water stains or ice (symptom gathering)
Do NOT attempt any of these—contact a licensed HVAC technician:
- Opening, cutting, or tightening refrigerant lines
- Adding or removing refrigerant
- Replacing capacitors, contactors, control boards, or any electrical component
- Repairing gas or combustion systems
- Working on a line that shows ice, frost, or oily residue (signs of a possible refrigerant leak)
If you suspect a refrigerant leak, turn the system off and use our repair or replace calculator to weigh options, then find a vetted pro through HVACDatabase contractor search.
Decision Tree: Should You DIY or Hire?
Click to view decision rules
- Insulation is cracked/missing but pipe is dry: DIY replace per guide above.
- Insulation is wet on the outside: Replace; check for rain exposure, use UV‑resistant material.
- Pipe is sweating profusely after new insulation: Insulation may be too thin—double‑up or switch to elastomeric rubber.
- Frost or ice on the large line: Do not insulate. Call a pro immediately; you likely have a refrigerant or airflow issue.
- Line enters home and disappears into finished space: If indoor insulation is suspect, hire a pro with thermal imaging to avoid opening walls unnecessarily.
Maximize Savings with HVACDatabase Tools
Before you buy materials, run a quick check on your system’s overall health:
- HVAC Cost Estimator — see what a professional insulation replacement or full tune‑up should cost in your area.
- Repair or Replace Calculator — if your AC is older than 10 years and insulation keeps failing, it may be time for a system upgrade.
- System Age Decoder — decode your unit’s manufacture date to assess remaining life.
Local Climate Considerations
- Hot, humid regions (Gulf Coast, Southeast): Condensation is the #1 enemy. Use thick‑walled elastomeric insulation and seal every seam. Check for moldy smells near the indoor line chase.
- Hot, dry regions (Southwest): UV radiation degrades foam rapidly. Replace with UV‑stabilized rubber and paint with latex UV coating if exposed to direct sun.
- Cold climates (Midwest, Northeast): Heat pump suction lines can get extremely cold in winter; insulate both lines to prevent freezing and sweating.
- Coastal areas: Salt air accelerates deterioration—choose closed‑cell elastomeric and rinse dust off during seasonal maintenance.
- Older homes: Original insulation may contain asbestos or be falling apart behind walls; if you see dust clouds when touching old insulation, stop and consult a pro.
Contractor Checklist
When hiring a pro for more than just insulation, ask these questions before signing:
- “Will you replace the entire outdoor run with UV‑resistant, closed‑cell foam sized exactly to my pipe?”
- “Do you seal the wall penetration with a code‑approved fire‑rated sealant?”
- “Does your quote include a refrigerant level check and coil inspection?”
- “Can you show me the brand and R‑value of the insulation you’ll use?”
- “Is this work covered by a labor warranty—for how long?”
- “What will the total cost be, inclusive of materials, labor, and any service call fee?”
Typical professional insulation replacement as part of a maintenance visit: $80–$250. Standalone insulation-only call may still incur a diagnostic trip charge ($80–$200). Annual maintenance plans ($150–$500) often include insulation inspection and repair.
Methodology
Recommendations are based on manufacturer installation guidelines (Armacell, K-Flex), ASHRAE standards for pipe insulation thickness, HVACDatabase editorial research, and aggregated contractor pricing data from our network. Energy‑savings estimates assume ⅝˝ wall thickness on a ¾˝ suction line in a 2,500 sq ft home. All cost ranges are editorial estimates; actual quotes vary by region, season, and system specifics.
Frequently Asked Questions
How often should I replace AC line insulation?
Inspect yearly. Expect to replace foam insulation every 3–5 years in sunny climates and every 5–7 years in shaded or mild areas. Elastomeric rubber may last 10+ years.
Can I just tape over cracked insulation?
No. Tape alone won’t restore the thermal barrier. Cracks allow moist air to condense on the pipe, accelerating corrosion. Replace the damaged section.
Does insulating the smaller liquid line help?
The small liquid line carries warm refrigerant and typically needs no insulation. Insulating it can actually trap heat and reduce efficiency. Only insulate the large suction line (and both on heat pumps in cold climates, where manufacturer may recommend).
My line is inside a wall—how do I insulate it?
If the indoor portion is degraded, you need a professional. They can often pull new insulation through the chase or use injectable foam. Avoid opening walls yourself; use HVACDatabase contractor comparison to find a specialist.
Does new insulation void my warranty?
No. Replacing external foam is considered routine maintenance. It will not void a manufacturer’s warranty. Always keep a record, however, in case of a future claim.
Related articles
Connect this page to adjacent guides so readers keep moving deeper into the topic cluster.

How to Implement a Whole Home Energy Management System
Integrate smart tech and HVAC controls to cut energy waste. This guide shows how to audit, upgrade, and automate your home's energy use, with real savings estimates.

How to Set Up Thermostat Geofencing
Set up thermostat geofencing to automatically adjust home temperature as you come and go. Save energy, extend equipment life, and never return to an uncomfortable house. Get our quick-start guide now.

How to Troubleshoot Smart Thermostat WiFi Issues
Your smart thermostat offline? Most WiFi drops can be fixed with power checks, router adjustments, and simple restarts. Follow our step-by-step guide to regain remote control and energy savings.